How to create CSS Layout using Flexbox
So, you have your first mockup or design in your hands, but how do you translate it to HTML and CSS? Should you rely on CSS frameworks like Bootstrap, TailwindCSS, or others? No matter your choice, it would benefit you to understand the mechanics behind the layout.
If you are in a hurry, here is a demo with the end result
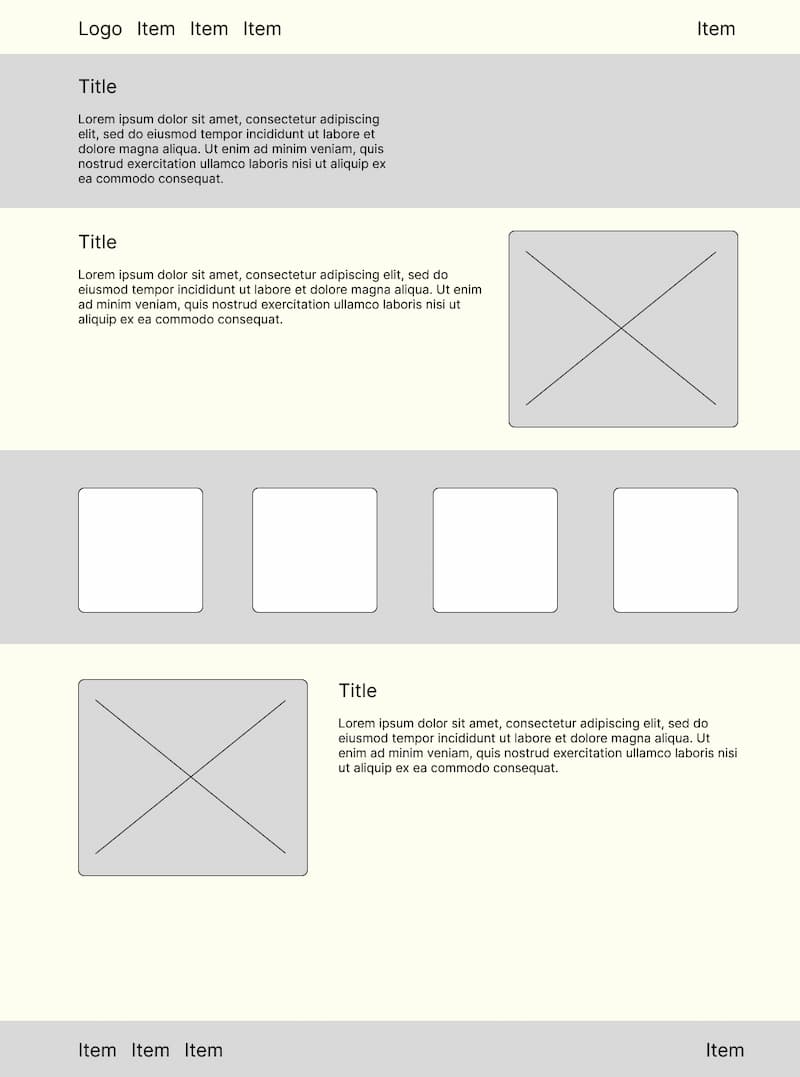
Let's say we have a standard mockup with a Header, Footer and a few sections. Before diving into code, I usually look at the mockup and figure out how many different sections I have. Let’s do that.

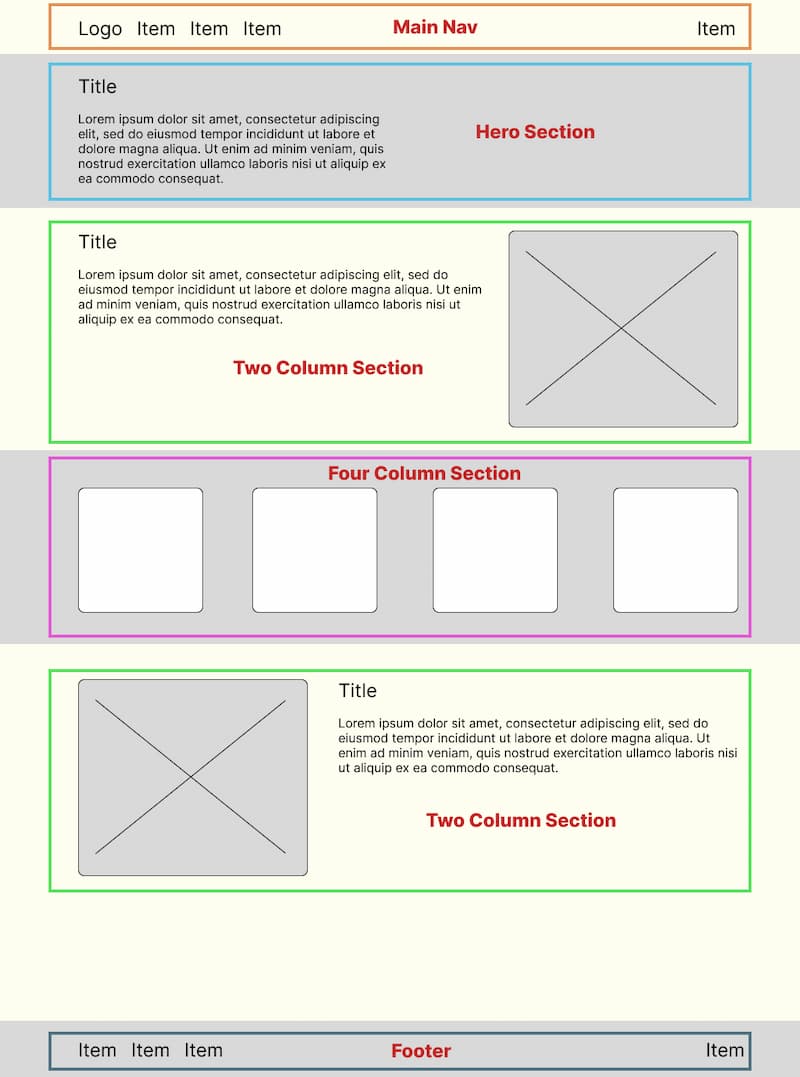
Here are our Sections:
- Main navigation
- Hero section
- Two column Section
- Four column Section
- Two-column Section, the same as (3) but reversed
- The Footer, which looks like it is attached to the bottom
We do not have Mobile view, but we can assume that Two Col section would stack image below and Four column would nicely collapse into one column.
I made visual adjustments to see each section.

Let’s add some colours we can use for our design. I use this colour palette: coolors.co
Setting up HTML structure
Setting up the basic HTML structure and using it semantically correctly is essential to get going. Semantic HTML has many benefits. It improves SEO and makes it more accessible for users with disabilities. Also, it makes code maintenance better, as you can read and understand the purpose of the elements.
Let's start with the basic HTML structure.
1 | |
2 | |
3 | |
4 | |
5 | |
6 | |
7 | |
8 | |
9 | |
10 | |
11 | |
12 | |
13 | |
14 | |
15 | |
16 | |
17 | |
18 | |
19 | |
20 | |
21 | |
22 | |
23 | |
 We use the following tags:
 nav, section and footer to highlight their
semantic purpose.
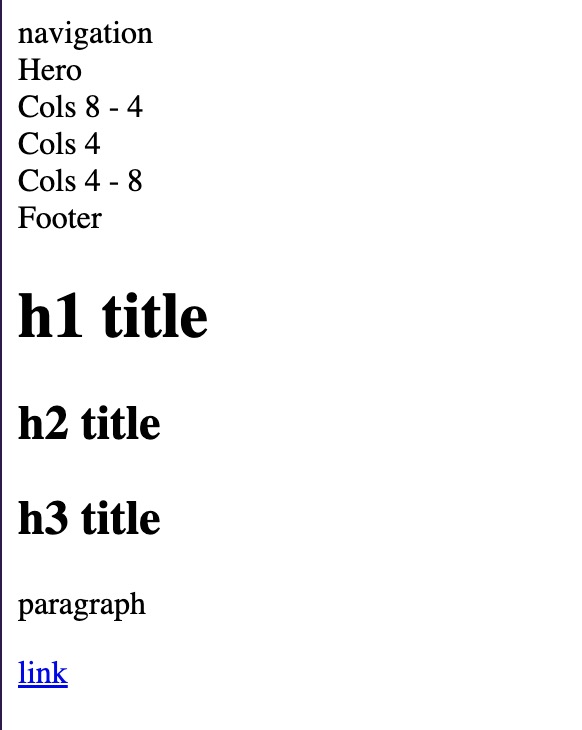
As you see, even though we didn’t add any CSS, the code above produces HTML with added style. The Browser has its own CSS stylesheet, the "User-Agent-Stylesheet.” This is why Title tags have different sizes and links have a default colour.
You can see this example in the CodePen.
CSS Reset
To remove inconsistencies and differences in rendering between browsers, we can use CSS Reset.
In the CodePen examples, I used built-in CSS Reset. However, there are plenty you can find. For example, The new CSS reset.
What does it do? Well, each browser has its own stylesheet for title sizes, list styling, body margins and paddings and many other things. Basically, reset.css zeroes all those values between browsers and makes all elements look the same. So, you can start your styling with a blank canvas.
Take a look at the pen below. All elements on the page look the same, although they represent titles, links, sections and paragraphs. To demonstrate this, I added The New CSS reset, but in the following examples, I will use CodePen's built-in Reset to reduce cluttering.
Now we have a clean blank and are ready to add some styles.
Fonts
Typography itself is a massive topic. There are font sizes, weight, line height, how text interacts with titles, and so on. At a minimum, we need to decide on a font family and define font sizes.
For font family, I will use probably the most known font family from Bootstrap
font-family: system-ui, -apple-system, "Segoe UI", Roboto, "Helvetica Neue", "Noto Sans", "Liberation
      Sans", Arial, sans-serif, "Apple Color Emoji", "Segoe UI Emoji", "Segoe UI Symbol", "Noto Color Emoji";
I will use the Utopia website's handy tool to calculate the font sizes.
Let’s add basic fonts for titles, links and paragraph tags which will be used for all website.
1 | |
2 | |
3 | |
4 | |
5 | |
6 | |
7 | |
8 | |
9 | |
10 | |
11 | |
12 | |
13 | |
14 | |
15 | |
16 | |
17 | |
18 | |
19 | |
20 | |
21 | |
22 | |
23 | |
24 | |
25 | |
26 | |
27 | |
28 | |
29 | |
30 | |
31 | |
32 | |
33 | |
34 | |
35 | |
36 | |
37 | |
38 | |
39 | |
40 | |
41 | |
42 | |
43 | |
44 | |
45 | |
46 | |
47 | |
48 | |
49 | |
50 | |
What is that :root part? The Root represents the document, or in HTML, it actually represents HTML.
Somehow, it is a tradition to define CSS variables to the :root element, and that’s exactly what I
did as well. I defined all font sizes; I won’t use all of them in the current example. However, colours will be
used fully. On the body tag, I defined the background colour and font family, and the rest is self-explanatory.
Layout Techniques
There are different techniques for approaching layout. A long time ago, when the grass was greener, I used the Floating technique to build websites. That was quite challenging and involved clearing after elements to get them aligned. The differences between browsers were massive, and IE6 was a real pain.
Currently, I mostly use CSS Flexbox and CSS Grid for CSS layouts. For our Mockup, I will use Flexbox. Here is a great resource if you need to refresh on a Flexbox: CSS Tricks. I also use it quite often myself.
I usually start from the top to the bottom and style each section one by one. Based on the Mockup, each section should be full width; however, the content itself is restricted to a maximum width. Also, the background colour for some sections should cover the full width of the element.
That means we can’t wrap the whole page in one div tag and add max width. If we did, we wouldn’t be
able to add a
full-width background colour for a few sections.
Navigation
Let’s figure out what is needed for Navigation. We have a max-width for navigation; we want it in the middle of the screen, and all but the last item should be on the left side.

1 | |
2 | |
3 | |
4 | |
5 | |
6 | |
7 | |
8 | |
9 | |
So, we have the <nav/> tag as a wrap and the first <div/> tag as the
container, which will hold max-width. If we look at the mockup, we notice that the same pattern is for each
section.
In that case, we can write something like that in CSS:
nav > div {
width: 100%;
max-width: 1200px;
 margin: auto }
However, we need the same for the Hero, Footer, and every Section. For that, we can use is()
selector
to grab all sections and define the same structure for each of them.
1 | |
2 | |
3 | |
4 | |
5 | |
Let’s define Navigation’s styles.
1 | |
2 | |
3 | |
4 | |
5 | |
6 | |
7 | |
8 | |
9 | |
10 | |
11 | |
12 | |
13 | |
14 | |
15 | |
Adding 1rem to the Nav I set some breathing space between items and Nav.
nav > div defines flex with the 1rem gap and chooses the font size for the items inside the nav.
The align-items center define the vertical alignment for the items.
Since we want the last item to be pushed to the far right, we add margin-left: auto, which will do
exactly what we want. This feels a bit like a magic trick and probably is. When we apply margin auto to the flex
child, it will fill that space and push the item in the opposite direction.
This should setup our Navigation in place. The only thing I want to add is the “logo”. For that, I will use Iconify website and choose the lighthouse from here: Icons. I choose it as SVG and replace the first item
That’s it. Our navigation is sorted using a few lines of CSS.
To simplify CSS, I use the built-in Pen CSS reset. So, if you copy HTML and CSS from the pen, remember to add your favourite reset CSS to replicate the example.
Hero Section
The Hero section is really simple. I want the background gradient to be filled full size and the text to stay max-width 600px. Why 600px? Because it is the comfortable width for reading.
1 | |
2 | |
3 | |
4 | |
5 | |
6 | |
7 | |
8 | |
9 | |
10 | |
11 | |
12 | |
13 | |
14 | |
For HTML, there is not much. I added a section with the class name hero, followed by
an inner wrapper div to fix the content and then the content itself. Instead of a background gradient, there could
be a background image. You also have to be careful with font colour as you have to think about accessibility.
1 | |
2 | |
3 | |
4 | |
5 | |
6 | |
Footer
In the mockup the footer seems to stick to the bottom of the page. Let’s add the footer now before we have too much content to test it.
Again, with the same principle as above, we will use footer tag with inner wrapper for content.
1 | |
2 | |
3 | |
4 | |
5 | |
6 | |
7 | |
8 | |
We want the last item to be on the right side, away from the rest, so I will reuse
margin-left: auto technique.
Since the footer background is dark, I will use reverse colours for the links.
1 | |
2 | |
3 | |
4 | |
5 | |
6 | |
7 | |
8 | |
9 | |
10 | |
11 | |
12 | |
13 | |
14 | |
15 | |
16 | |
17 | |
18 | |
19 | |
20 | |
21 | |
22 | |
Remember, I defined body tag like this.
1 | |
2 | |
3 | |
4 | |
5 | |
Before we use the magic power of margin auto, we need to set the page height to 100%. This is important!
1 | |
2 | |
3 | |
Now, when I define margin-top: auto on the footer, it will use that Flexbox magic and create a space
between other elements, and that’s how we get the footer to stick to the bottom.
Two column sections
So, by looking at the mockup, we can see that there are two columns, and the size is roughly 2:1. I take a 12-col grid approach, so it is like 8:4. We will use the same approach as with the rest of the site. We will use a Section and an inside div wrapper.
1 | |
2 | |
3 | |
4 | |
5 | |
6 | |
7 | |
8 | |
9 | |
10 | |
11 | |
I’m using an article tag for the main part and an aside tag for the sidebar where I will keep the image.
The rest is straightforward. Firstly, I will give 2rems for the section.
For the inner <div> I will use the flex and direction column for mobile, and from the screen
size 600px, I want to switch to flex-direction: row.
I will use gap: 1rem. Why gap? That way, I can switch in reverse and don’t need to adjust margins between elements. The gap is awesome!
The article and the aside will both use flex, as I want to use flex size. So, the end result will look something like this.
1 | |
2 | |
3 | |
4 | |
5 | |
6 | |
7 | |
8 | |
9 | |
10 | |
11 | |
12 | |
13 | |
14 | |
15 | |
16 | |
17 | |
18 | |
19 | |
20 | |
21 | |
22 | |
23 | |
24 | |
25 | |
26 | |
27 | |
28 | |
29 | |
30 | |
31 | |
32 | |
33 | |
It's worth noting that I use @media query to accommodate different screen sizes. First, I define
content direction as a column.
1 | |
2 | |
3 | |
4 | |
5 | |
Once the screen size is above 600px, I will use the flex-direction row:
1 | |
2 | |
3 | |
4 | |
5 | |
Ok, great. Now, we have two columns implemented.
However, the second column looks very similar to the first one. The only difference is that the text and image are switched around. With Flex, it is super easy to reverse those two columns.
flex-direction: row-reverse and that’s it.
We want to use reverse only for screens above 600px.
1 | |
2 | |
3 | |
4 | |
5 | |
6 | |
7 | |
8 | |
9 | |
Of course, for a reverse column, I use the additional class name reverse.
Four column section
To make things more fun, I want different content in those columns. Let's say I would add text in some and an image in others, which would fill the container fully. Also, I want those columns to start at mobile size and magically grow and expand with the screen size.
Let’s start with HTML and use the same pattern as before.
1 | |
2 | |
3 | |
4 | |
5 | |
6 | |
7 | |
8 | |
9 | |
10 | |
11 | |
12 | |
13 | |
14 | |
15 | |
16 | |
17 | |
18 | |
Now, the fun part!
For those columns, I want to use a CSS grid. SmolCSS fully inspired me, and you should be, too! smolcss.dev
First, we wrap the usual bit in a section and give background colour and paddings.
The next part is the fun bit. I use the arbitrary value of 28ch, which takes the character zero-O width of the font. The gap between the columns is 1 rem. The fancy bit is the last line.
I define one unit as taking 1 fraction of space and define the min/max values for that space.
Although I define it as a four-column layout, in reality, I could add more or remove some columns. I simply
calculated that 28ch, in this case, would take one row with four items. Nothing will break if I
remove or add
more items; however, at some screen sizes, it could leave some empty space.
1 | |
2 | |
3 | |
4 | |
5 | |
6 | |
7 | |
8 | |
9 | |
10 | |
11 | |
12 | |
13 | |
Ok, let’s define text size. Since I use dark blue, I want the font a bit smaller but with added letter spacing.
1 | |
2 | |
3 | |
4 | |
5 | |
6 | |
To style each column container, I can use a direct child selector, which is very handy as I don’t need to add any classes. I use overflow hidden as I don’t want the image to leave the container. You will see that in a bit.
1 | |
2 | |
3 | |
4 | |
5 | |
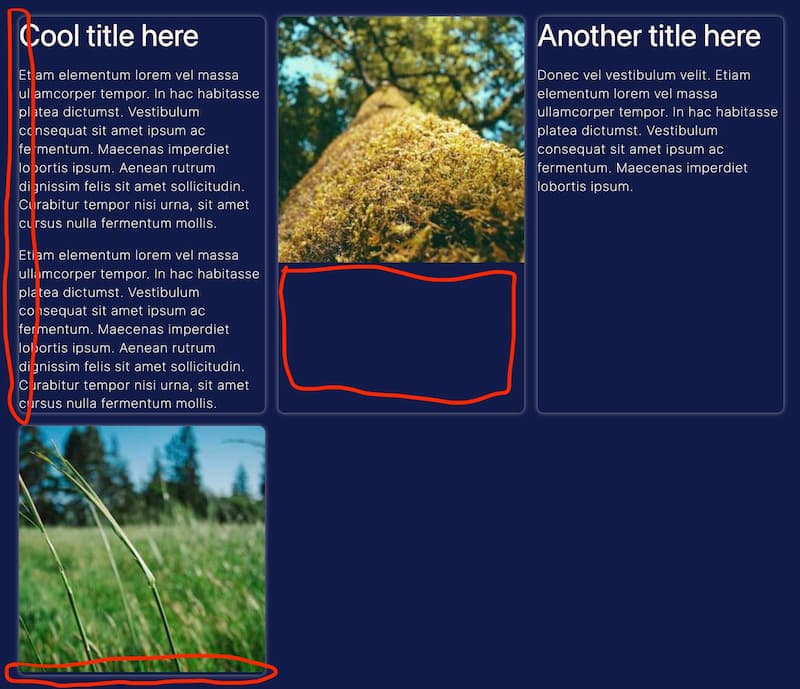
This is the result. It's not good. The text is very close to the edge of the container. If we add padding for the text, we will push the image away, too. We want the images to be full height and width. Also, there is this silly 4px gap for the last image. Let's fix all this nonsense!

Let’s add 1rem padding for the container, but only if there is no image.
1 | |
2 | |
3 | |
Let’s remove the 4px gap and make the image fill the container's space completely. Adding more text in the next
column will push the image container, too, so to avoid the empty gap, we use object-fit: cover.
1 | |
2 | |
3 | |
4 | |
5 | |
6 | |
The last thing I want to add is underline for all but Navigation links.
1 | |
2 | |
3 | |
4 | |
5 | |
6 | |
7 | |
8 | |
Final result
Here is the final result. It took less than 200 lines of CSS, including colours and font styling.
Do we really need a CSS framework? For big projects with multiple members, it makes sense to use the CSS framework as it sets the basic rules. For an in-house project with 2-3 developers, if they agree on an approach, it might be better to build it from scratch.
Conclusion
Do you think I missed something or got something wrong? Do you have a better solution? If you have any questions or comments, please feel free to contact me on Mastodon or LinkedIn
Happy Coding!
PS. This article is written by a human.